

How to make a Shapefile – Copy to Layer tool
Overview
In this workflow, we will guide you through creating detailed maps to visualize and manage your forest data effectively. You’ll learn to select data layers, customize features with symbology and labels, and adjust transparency, ensuring your maps highlight key features and enhance decision-making.
Need More Help?
For personalized assistance tailored to your specific needs, speak with a knowledgeable customer service representative.
Workflows
This workflow allows you to export Spatial ai Tract, Stand, or other DSL_Features as shapefiles which may be shared with a contractor, loaded on a rugged field PC, or other use.
First open a Working Set with Tracts and Stands or DSL_Features
- Navigate to the area of interest,
- Select the feature(s) you would like to export,
- Note: when exporting as shapefile, features must be of same class
- Rt-click, Copy To Layer
- Follow the instructions in Copy To Layer dialog box illustrated below
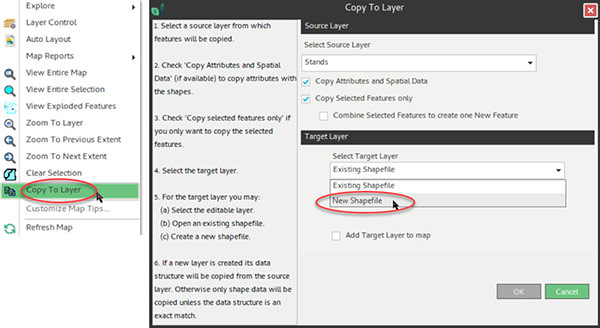
- Save layer features to a New Shapefile. Be mindful of target file location.
- After field work is completed and you would like to add new shapefiles to a Working Set,
Click the “Add Layer > From File… “ button in the ribbon. (illustrated below)
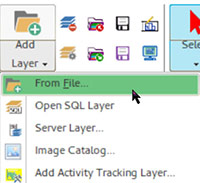
Tip: Whenever importing shapes via ‘Add Layer’ From File, use the shapefile as a guide rather than copying directly into Stands/Tracts/etc. This will ensure greater data integrity and prevent topology errors.
Copy to Layer Examples
Below examples are the workflow for creating new DSL layer features. Same concept and steps as for a Stand Edit, Disposition Plan, or other layer that is distributed through your organization via Datamover.
1. Select the feature to copy (whether a Tract or a shapefile)
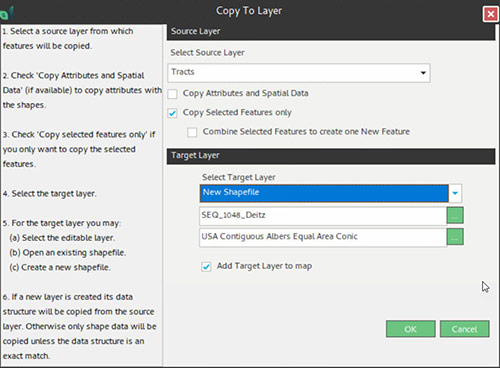
2. Rt-click, Copy to Layer >>> Target Layer can be a new shapefile or DSL layer such as DSL_Stand_Edits, DSL_Disposition_Plan, etc.
Below: Source is Tracts, Target Layer is New Shapefile
Below: Source is a Shapefile, Target Layer is the editable layer, DSL_Disposition_Plan.
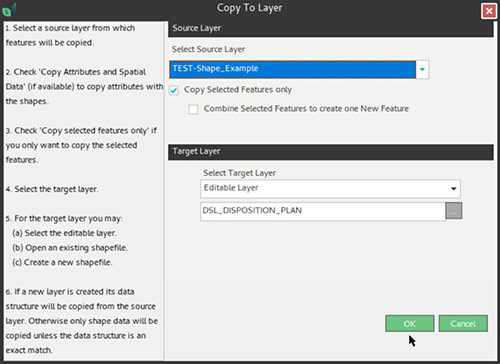
After clicking OK, be sure to save shapefiles to a folder you can easily find, or if DSL feature, fill out the DSL form as prompted. Notify your team to look for the new feature (run Datamover if you are a standalone user).
If you have any questions, contact Silvics Support 205-977-7707 | support@silvics.com