

Operating Ownership
Overview
This document outlines the functionality and operation of the Silvics Spatial AI Ownership Module. Users will become familiar with the module’s operation and understand how to navigate and operate it effectively and efficiently. This documentation begins by outlining the value of incorporating the Ownership module into land record management workflows.
The benefits of migrating land record keeping to Silvics Ownership begin with accessibility. The Ownership module enables users to quickly locate land records associated with any piece of land that is either in their possession or for which they hold rights. All information regarding that piece of land is stored within the Ownership system and offers a simplified and intuitive interface to view and edit data. Data is stored in a relational database, which
Need More Help?
For personalized assistance tailored to your specific needs, speak with a knowledgeable customer service representative.
means users no longer need to follow paper trails to see how property is encumbered, who holds rights, and when those rights expire. This information is presented through spatial layers. The ability to access, view, and edit this information alongside the geographic representation of the land provides a powerful tool when properly utilized.
Further, under the umbrella of accessibility, the Ownership module’s design encourages standardization. The system provides clearly defined fields for data input as well as fields that correlate data with common attributes. This prevents data duplication and allows changes to top-level data to cascade to related items. For example, changing the name of a transaction subsequently updates the associated conveyances to match the new transaction name.
Workflows
Working with Ownership
Accessing Ownership
To begin, navigate to the Ownership module. Open Spatial AI and log in normally. At the bottom of the Map TOC, click on Silvics Ownership. A new main canvas will appear that looks nearly identical to Spatial AI. This design similarity makes working with Ownership easier and reduces the learning curve.
Transactions & Ownership Parcels
Transactions serve as the central reference point for all other features; however, transactions themselves are not a feature layer. This means users cannot ”draw” transactions on the map. This design helps maintain data integrity and prevents orphan records from appearing as a result of changing data too high in the hierarchy. Users can create transactions when inputting a new feature into the Ownership, Land Rights, or Encumbrances layer.
Creating an Ownership Parcel
Step 1: Begin by bringing the Ownership Parcel layer in from SQL.
Step 2: Right-click on the layer in the Map TOC on the left side of the window and select Editable.
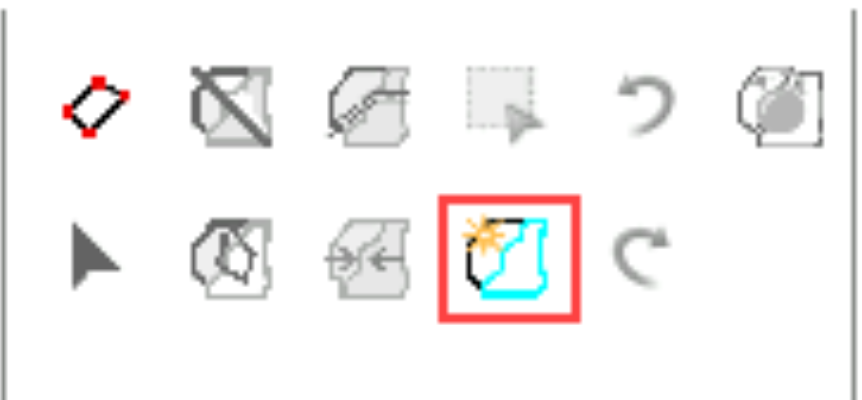
Step 3: In the upper right, inside the ribbon under the Home tab, select the Add New Feature button.
- This button can also be accessed under the Edit tab.
Step 4: Draw the desired shape on the map.
- If using an existing shape file, under the Home tab, click the drop-down where it displays Add Layer in the ribbon.
- Click From File, navigate to the desired shape file, and double-click on it.
- Next, with the Ownership Parcel layer still editable, click inside the shape file to select it. canvas and select Copy to Layer.
- Ensure the shape file is selected under the Select Source Layer drop-down.
- Verify that Target Layer is set to Ownership Parcels.
- Right-click anywhere within the map
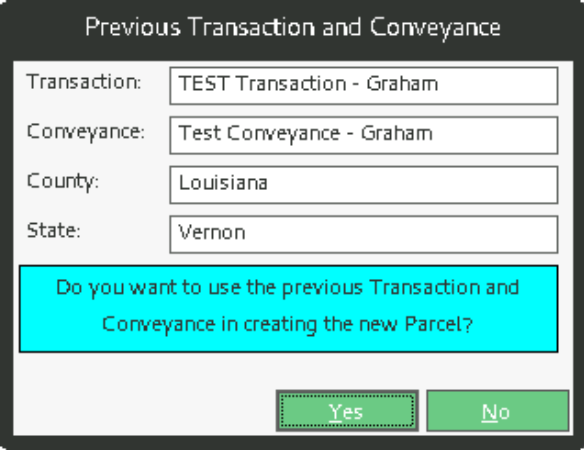
Step 5: Once complete, one of two windows will appear:
- If another Ownership parcel has been input recently, a small window will appear asking whether to use the last used transaction.
- If this is not the case, select the appropriate option.
- The Create New Ownership Parcel window should now appear.
Step 6: In the Create New Ownership Parcel window, select New or choose a transaction from the drop-down menu.
Step 7: Once New has been selected, a second window labeled Acquisition Transaction will appear.
Step 8: This window contains all relevant information fields related to the transaction. Many of these fields are open for user input, meaning entries such as file numbers are not validated against existing data. Users must verify naming schemes and ensure correct information has been entered.
- Required fields include:
- Name
- Transaction Area
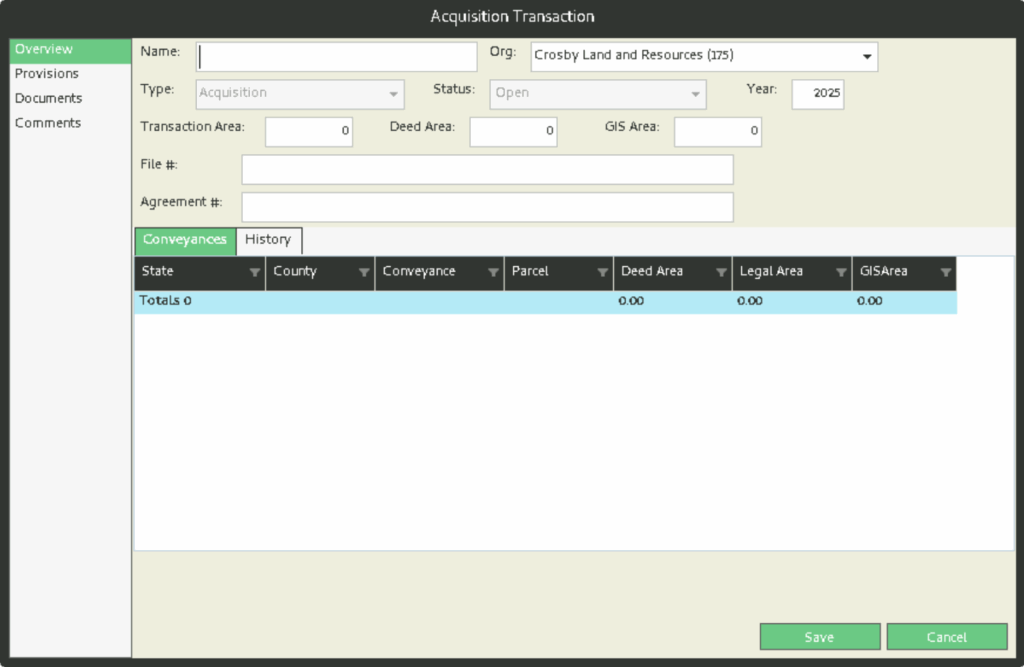
Step 9: The Conveyances table will likely be blank. This will be addressed after saving the Transaction.
Step 10: The Provisions tab on the left can only be populated after the Transaction has been saved.
Step 11: Below Provisions is Documents. Here users can upload files pertaining to the Acquisition, such as surveys, contracts, and other relevant documents.
Step 12: The Comments section is available for additional notes and information.
Step 13: Once all desired information has been entered, click Save in the lower right corner.
Step 14: A second window will appear asking to select or create a conveyance. Select New next to the drop-down menu.
Step 15: A Conveyance form will appear with some information pre-populated, including transaction, state, and county information. This form is similar to the Transaction form and follows the same guidelines.
- Required fields for this form include:
- Name
- Instrument
- Type
- Purpose
- Grantor
- Grantee
Step 16: Once the form has been completed, click OK in the bottom right corner of the window.
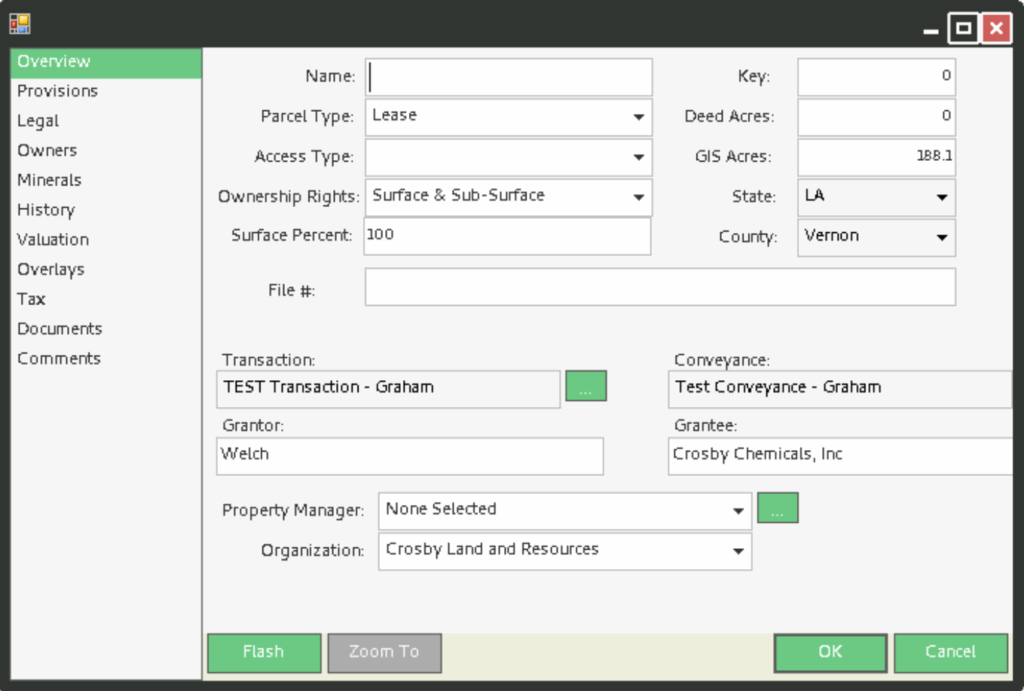
Step 17: A final window will appear allowing entry of all information relating to this parcel. Detailed options for this entry will be covered in another section.
Land Rights & Encumbrances
The Land Rights layer tracks all pieces of land for which users hold rights as well as any data related to those parcels. An encumbrance represents a third party’s right to land that users own. The Encumbrance layer allows tracking and quick access to information pertaining to those rights held by other parties, without the need to search through documents. Both layers function similarly and follow comparable procedures for data entry and management.
Creating a New Land Rights Parcel or Encumbrance
The procedure for drawing or importing shapes into the Land Rights or Encumbrance layer follows the same process outlined in Steps 1-5 of the previous section. However, please note the following placement requirements:
- Land Rights can only be placed outside of Ownership parcels
- Encumbrances must be contained within Ownership parcels
The system will reject any Land Right or Encumbrance that does not meet these placement criteria.
Step 1: Once the shape has been drawn or copied to the layer, the system will request association of this parcel with a transaction.
- If following the previous section, the previously created Transaction will not be selectable in the drop-down menu.
- This is intentional; a transaction represents either the acquisition of property or the sale of property, not both.
- Setting up a transaction follows the same process detailed in the previous section.
Step 2: After selecting the Transaction, a second window will appear requesting selection or creation of a conveyance.
Step 3: The Land Right / Encumbrance form will then appear. Only the Name field is required to save this Land Right.
Step 4: In the Overview tab, users can change the Name, associate Transaction/Conveyance, and enter Deed Acres. The checkboxes Geography Not Finalized and Inherited can be selected as needed.
Step 5: The Condition tab displays a table showing conditions associated with this Land Right.
- To add a new condition, click the Add Condition button.
- A new window titled Condition will appear.
- Under Condition Type, select the appropriate qualification for the condition.
- The text field allows for detailed information pertaining to this condition.
- Enter the begin and end dates as appropriate.
Step 6: The Legal tab displays Section, Township, and Range information that is pre-populated. Below this is a section for additional legal information.
Step 7: The Overlays tab allows association with other parcels.
- If clicking Add does not display the desired parcel, change the search radius in the bottom right corner and click Refresh.