Query Tool Workflow
Overview
In this workflow, we’ll use the Query Tool to find stands that need a survival check, filtering results based on specified criteria. A video tutorial along with a step-by-step guide will help you through the process.
Need More Help?
For personalized assistance, speak with a customer service representative or join our monthly training session.
Workflows
This instructional video on using the Query Tool to efficiently identify stands needing a survival check and accurately pinpoint areas requiring attention.
Step-by-Step Instructions
Step 1: In the top-left corner of the tool ribbon, select the SQL Query Tool. The Query Tool is active and the Query Builder window opens.
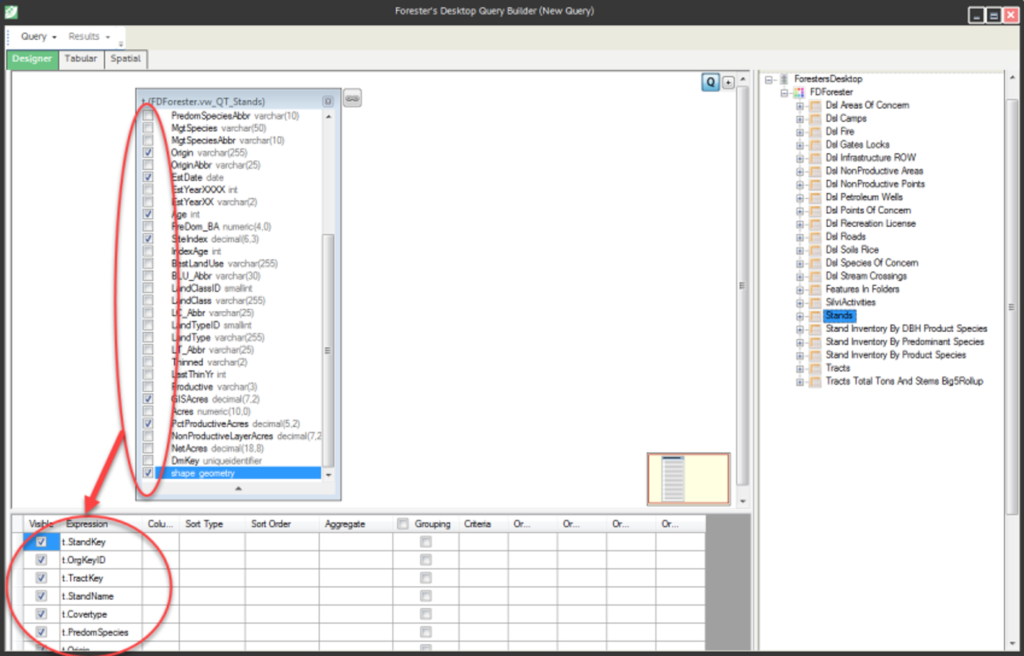
Step 2: In the pane located on the left of the Query Builder window, scroll to find the Stands view. Users can either double-click the option or “grab and drag” it to the Designer window.
Step 3: In the Stands view field list, check the boxes beside the following attributes (selected attributes appear in the table at the bottom of the Designer view):
- StandKey
- OrgKeyID
- TractKey
- StandName
- Covertype
- PredomComm-Species
- Origin
- EstDate
- Age
- SiteIndex
- GISAcres
- PctProductiveAcres
- Shape

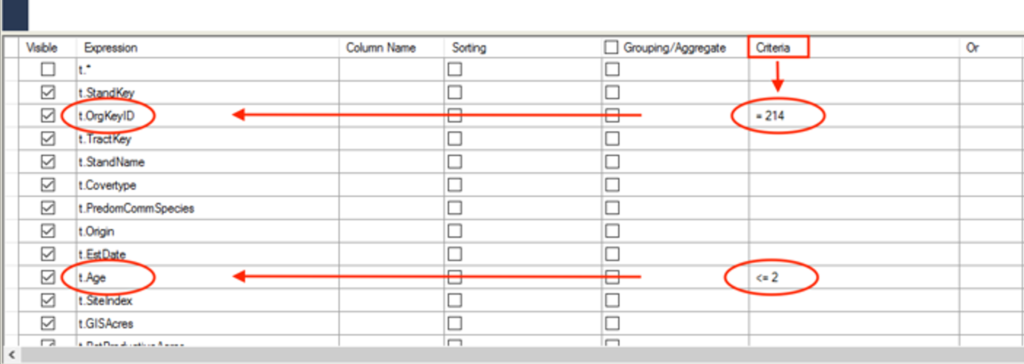
Step 4: In the Designer grid view, add Criteria for the following:
- Set the Age criteria as follows: “<=2”
- Specify the OrgKeyID you wish to limit your results to by typing it into the OrgKeyID Criteria column.
Note: All Users do not see the same OrgKeyIDs, thus Users will not be able to follow along with same OrgKeyID. By clicking the Tabular tab at the top-left of the window, Users can scroll through the queried options they can specify by with just the age criteria input.

Step 5: Select the Tabular tab. Tabular values associated with the query are returned.
Step 6: Select the Spatial tab. The Stands listed in the return set (in Tabular tab) are visualized spatially. Users can zoom by double-clicking the screen and “grab and drag” to maneuver the map.
Step 7: Select the drop-down arrow next to “Results” and choose the “To Map Layer” option from the sub menu. The Choose file location dialog window opens.
Step 8: In the Choose file location dialog window:
- Select the location where you wish to save the file
- Give the query file a name
- Click <Save>
The Progress dialog window opens, indicating that the system is preparing to send the query results to a map layer, and the resulting layer will display in the Map Explorer-Map TOC tab.

