Mapping: Auto Layout from Selected Features
Overview
In this workflow, users will learn to print maps from selected features in the Map View using a pre-defined template in Auto Layout. This process ensures professional-quality printed maps with some customization options.
Need More Help?
For personalized assistance, speak with a customer service representative or join our monthly training session.
Workflows
Pre-Work: Ensure Layer is Selectable
Step 1: In the Map TOC tab of the Spatialai Explorer Module, right click on the name of the layer (“Stands”). A context menu will appear.
Step 2: If the Stands layer is not Selectable (not highlighted green in the context menu), click the empty checkbox to the left of the word “Selectable.” The context menu will close and the Stands layer is now selectable.
Select Features and Send Them to the Auto Layout Wizard
Step 1: In the Map View, select three stands that you want to send to an Auto Layout. Note: Stands do not have to be coincident. To select multiple stands that are not coincident, hold down the control key while selecting the features.
Step 2: In the Map Tab of the Ribbon, select the Auto Layout tool to prompt the Auto Layout Wizard window. Note: Keep reading to learn how to properly move through the Auto Layout Wizard steps.
Auto Layout Wizard
Step 1: Set the scale to use for maps. Select “Best Fit” and click <Next> to move on to Step 2.
Step 2: Select a Template.
- In the Select template box, click on the ellipsis on the right side of the text box.
- Select the template you wish to use from the Browser for template dialog window and click <OK>.
- Click <Next> in the Auto Layout Wizard to move to the next step.
Step 3: Choose Layers for the Legend. In the Choose Layers to appear in legend form, select the following layers:
- Stands
- Tracts
- DSL_AREAS_OF_CONCERN
- Any other layers you wish to add
Click <Next> to move to Step 4.
Step 4: Choose whether to highlight features. If yes, check the box to highlight the features in the template map that are highlighted in the Map View. Click <Next> in the Auto Layout Wizard.
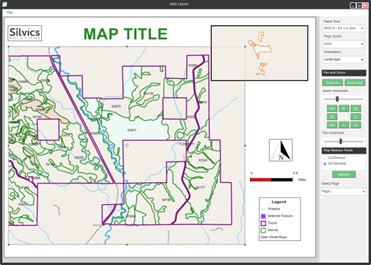
Step 5: Click <Finish> in the Auto Layout Wizard. The window will close to display a similar view as below:

Print Your Maps
Step 1: In the top left of the Auto Layout window, select “File” to open the context menu.
Step 2: Select Create PDF, prompting the Output to PDF dialog window to open.
Step 3: Set the location where you wish for your file to be saved and select other options as you wish. Click <OK> to save the maps and close the dialog window.

