Mapping: Add an Inset Map to a Page Layout Template
Overview
In this workflow, users will learn to create a Page Layout Map that includes both the main map from the Map View and an inset location map.
Need More Help?
For personalized assistance, speak with a customer service representative or join our monthly training session.
Workflows
How to Add a New (2nd) Data Frame to the Map View
Note: Upon opening Silvics Spatialai, notice that the primary Map that opens will contain all of the layers and group layers as previously defined by you in your working set.
Step 1: Right-click on the Map contents and select New Map from the contents menu. A new empty map data frame will open below the existing Map data frame.
Note: You may need to collapse the original Map data frame (click on the down arrow next to the data frame’s name) to easily get to the New Map data frame.
Name the New Map Data Frame
Step 1: Right Click the New Map data frame and select “Map Properties” from the context menu, prompting the Map Properties dialog window to open.
Step 2: Rename the map “Locator Map”. Additionally, set the coordinate system properties and the map background colors.
Step 3: In the Map Properties dialog window, click <OK>. The Map Data Frame is renamed in the Explorer Tree to “Locator Map.”
Add Spatial Layers to the Locator Map Data Frame
Step 1: Right click on the Locator Map data frame, opening the context menu. Select “Add Layer,” then “Open SQL Layer” from the submenu. The Open Layer dialog window opens.
Step 2: In the dialog window, select select any pre-defined SQL layer from the list to be added (For Example: select Tract, Stand, County, and State).
Step 3: Click <OK> to close the dialog window. After selecting the spatial layers, the selected map data frame shows the layers in the Explorer Map TOC tab and opens with the default symbology in the Map View.
Prepare the Layers to be Shown in the Locater Map and Open the Page Layout in the View Frame
Step 1: Set symbology for layers to be shown in the locator map. Note: Symbology works the same way regardless of which data frame you are working in. If you need assistance setting Symbology, please refer to the document “Symbology Workflow.”
Step 2: With the Locator Map data frame selected and visible in the map view, use the Zoom tools to focus on the area you wish to show in the Locator Map on the page layout.
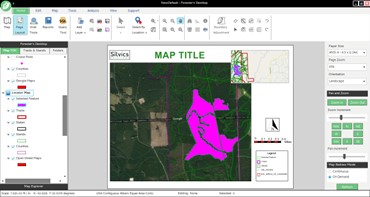
Step 3: Switch the View Frame to Page Layout View. The window will then display a similar view as shown below:

Alternatively: Open, Modify, and Save a Map Template
Step 1: Right click anywhere in the Page Layout view and select “Load Page Layout Template” from the context menu.
Step 2: Navigate to a predefined template and click <Open>.
Step 3: The Page Layout can be modified using the tools on the right-side pane or via the context menu (right click). Note: For specific instructions on modifying the page layout view, please see the document: “Mapping: Create a Page Layout Map.”
Step 4: To save the map template, right click anywhere in the Page Layout view and select “Save Page Layout Template” from the context menu.
Step 5: In the Save As dialog window, navigate to the location where you wish to save the template.
Step 6: In the File Name field, enter the name of the template and click <Save>. The Save As dialog window closes and the template is saved and can be used at a later date.

