
LoadBOSS 2.0 – Mobile App User Guide
Install
One-Time Permission Required When Opened
When you install LoadBOSS 2.0, the app will request the following permissions to ensure all features work correctly (without granting these permissions the app will not function properly.)
1. Location Permission
You will see a prompt asking: “Allow LoadBOSS 2.0 to access this device’s location?”
Always choose Precise, and select:
- While using the app (Recommended)
- Only this time
- Don’t allow
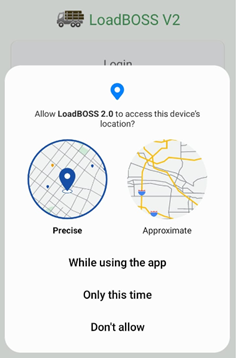
This permission is required for capturing the correct GPS location when authorizing any ticket, updating any ticket, syncing, and setting screen to show current location.
2. Camera Permission
You will see a prompt asking: “Allow LoadBOSS 2.0 to take pictures and record video?”

Available options:
- While using the app (Recommended)
- Only this time
- Don’t allow
This permission is required for taking photos of scale tickets either from Gallery or using Camera.
Login
1. Open the App
- Launch LoadBOSS 2.0 on your mobile device.
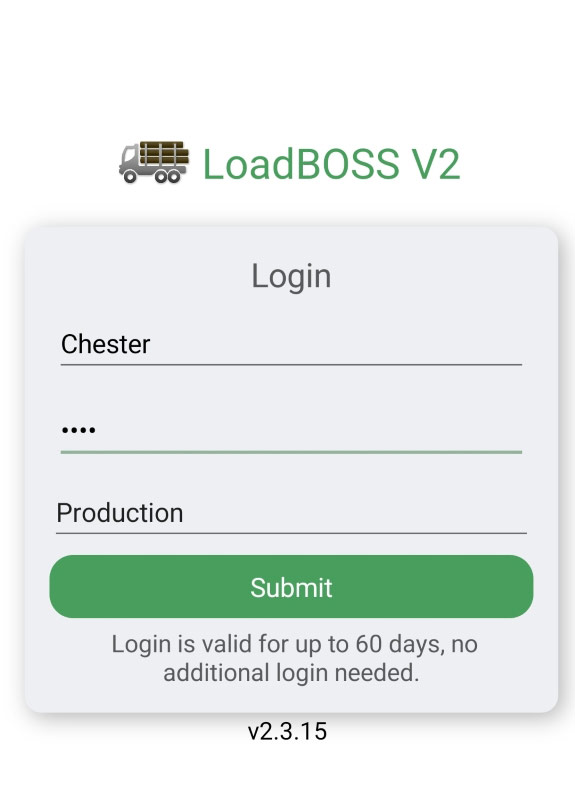
2. Login Screen
The Login screen contains the following fields:
- Username → Enter your username (this is case sensitive).
- Password → Enter correct password (also case sensitive).
Environment Selection
- Production should be selected for real-world operations.
- Sandbox is used only for testing purposes and does not affect live data. All data in this environment is isolated from Production data.
Generally, the app will remain logged in and should work without any additional login for up to 60 days.
There is another option after successful login: In Settings à Renew Login (button) without re-entering Username or Password.
3. Submit Login
- Tap the Submit button (green).
- With proper credentials you will be taken to the main dashboard.
- If not – then invalid username/password or no internet connectivity.
- Error msg: Unable to communicate with the server, please check your internet connectivity.
- If Username & Password are both correct and an error persists, possibly the User account was deactivated or permissions to sales and orgs were revoked by an Administrator. Please check the permissions in the Web Portal.
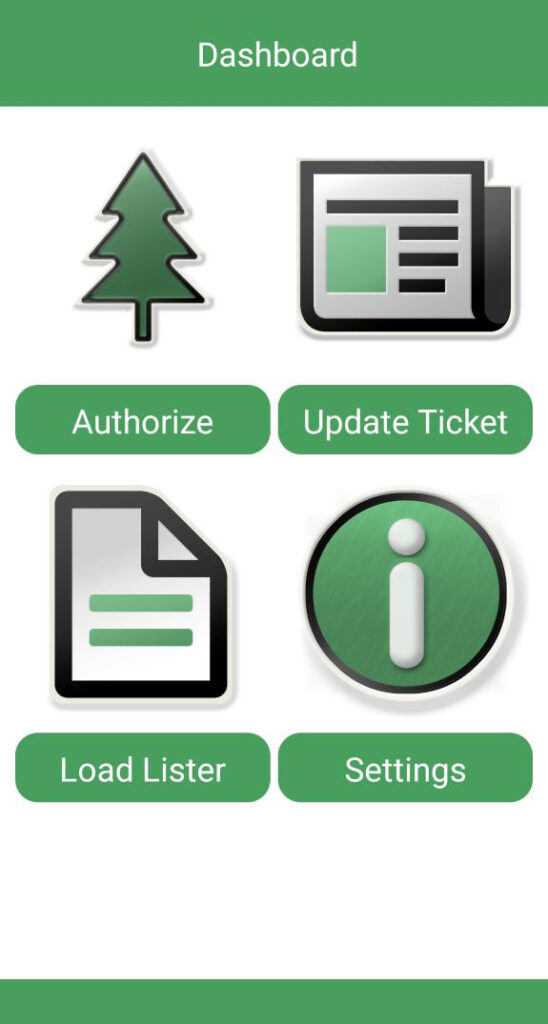
Dashboard
The Dashboard is the main screen of the LoadBOSS 2.0 mobile application. It provides quick access to all major functions after logging in.
Main Navigation Buttons
· Authorize Load – Used to authorize new load tickets.
· Update Ticket – Used to enter scale ticket and tonnage information
· Load Lister – Displays a list of all saved load tickets on the device/server.
· Settings – App Settings screen for user to manage key settings including:
- Toggle Operate Offline mode on/off.
- Perform a manual Sync Now with the server.
- See pending data status.
Authorize Load
Users enter ticket numbers on the Authorize Load screen. Each load ticket will be verified to ensure that it is valid for that sale.
Enter Ticket Number Screen
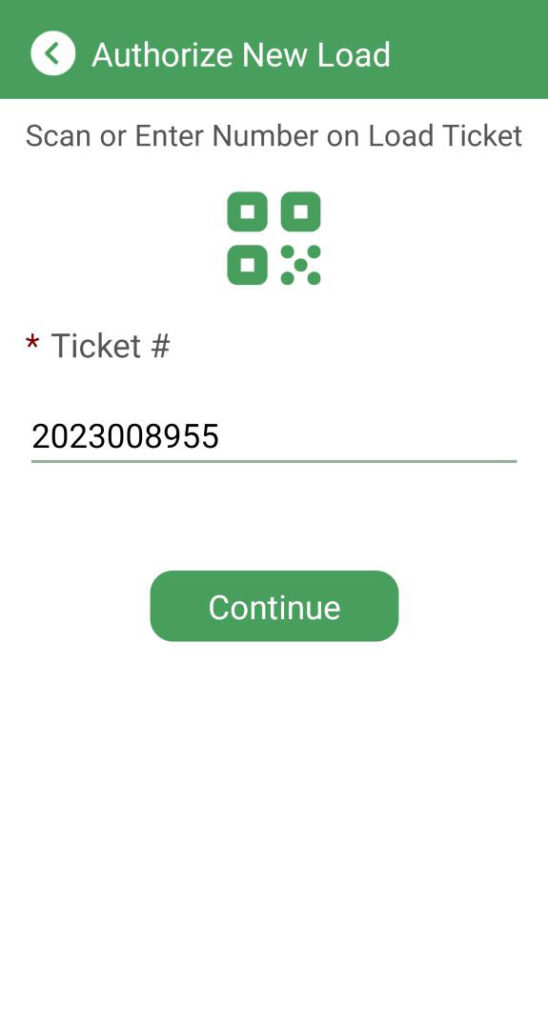
Key Elements
- QR/Barcode Icon: Selecting this icon opens the camera to scan a QR Code.
- A valid scan will autofill the Ticket # field of Authorize Load screen.
- Any invalid codes display this error message: “Scanned QR Code is not valid…” and Retry button appears.
- To exit the screen, users must manually tap the back button (<) and manually enter the Ticket #.
- Ticket # Field: A required field (red asterisk *) to enter or verify the ticket number.
- Operating Offline: While operating offline, the same ticket number may be authorized on multiple devices, but only the first authorization will be accepted by the server. Subsequent tickets or authorization requests will be discarded.
- Continue Button: Validates the ticket number and proceeds to step two.
Authorize Load – Step 2
After validating the ticket number, the app collects more information to submit to server.
Example:
If the user enters 2023008955 they may continue to enter more details such as Buyer, Product, Logger, Destination, etc.
Until all required fields are completed and submitted, ticket authorization is not complete.
Validation Rule (if applicable)
The ticket number must be valid both in Online and Offline modes to proceed.
In Online mode, when stable internet is available, ticket info is submitted instantly to the LoadBOSS server.
Operating Offline
With the Operate Offline switch is enabled, unless a user goes to Settings and taps the Sync Now button, no information is sent to the server.
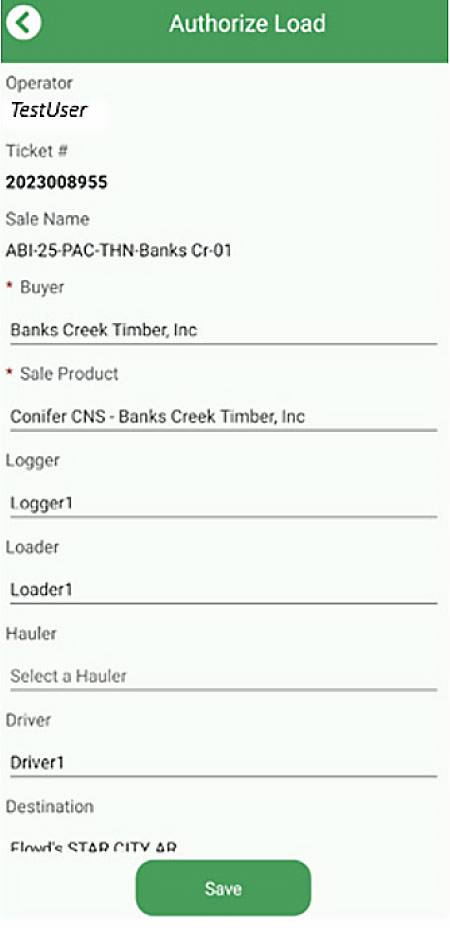
Key Elements
- Operator: Displays the user currently logged into the application (e.g., TestUser).
- Ticket #: Shows the load ticket number entered.
- Sale Name: Displays the sale associated with the ticket.
- Buyer (Required): Name of the buyer linked to the sale.
- Sale Product (Required): Product/Log type loaded onto the truck (auto-populated from sale details if only one product associated, withmore than one, a user must select the Product).
- Selected Product must have a valid effective date and expiration date to complete authorization.
- If dates are invalid or expired, update the existing product or create a new one with valid dates in the LoadBOSS Web Portal for stand-alone users or Silvics Office for integrated users. If adjustments are made in Silvics Office, you must click Sync with LoadBOSS before changes are registered with LoadBOSS.
- Logger: Identifies the logger associated with the load. Users enter the appropriate name. This field is stored locally and will automatically repopulate with the last value used.
- Loader: Identifies the loader responsible for the load. Users enter the appropriate name. This field is stored locally and will automatically repopulate with the last value used.
- Hauler: Dropdown menu to select the hauler transporting the load.
- Driver: Displays or allows selection of the assigned driver. Users may enter the correct driver’s name. This field is stored locally and will automatically repopulate with the last value used.
- Destination: Displays the delivery destination for the load. If any Destination is missing, this can be added in the LoadBOSS Web Portal for stand-alone users or Silvics Office for integrated users.
- Save Button: Sends the authorized load details to the LoadBOSS system. It can be viewed instantly when an active internet connection is available on the mobile device. If device is operating in offline mode, after clicking on the Sync Now button, it can be viewed in the Web Portal.
Example:
Ticket 2023008955 for sale ABI-25-PAC-THN-Banks Cr-01 can be reviewed and authorized by confirming buyer, product, and transport details, then tapping Save.
Update Ticket
Authorizations
Purpose
The Authorizations screen displays a list of all authorized load tickets, allowing users to review load details, apply filters, and access specific authorization records.
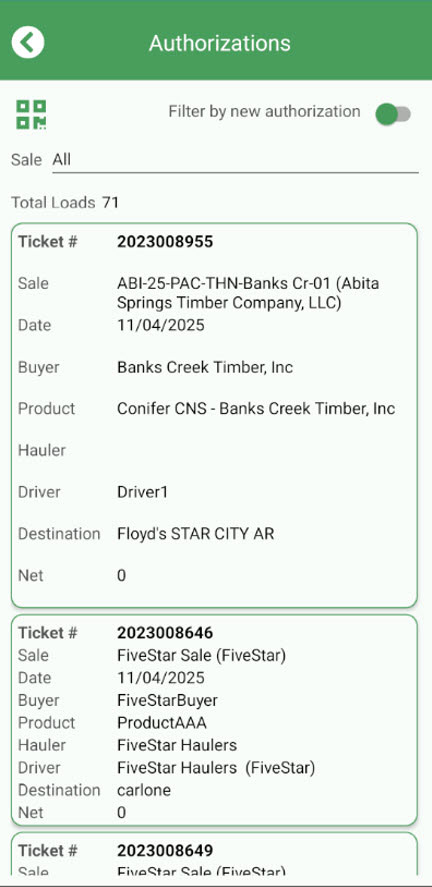
Key Elements
- QR/Barcode Icons: Same functionality as Authorize Load screen. Provides scan options for quickly locating a specific load.
- Filter by New Authorization (Toggle):
- When on, shows only authorized loads that have not yet been updated.
- When off, shows all authorized loads.
- Normally, once Tons are updated, tickets are automatically sent to the LoadBOSS server and removed from this screen. If not, they will sync within 15 minutes and then disappear.
- Sale Dropdown: Allows filtering of loads by sale. Selecting All displays records from all sales.
- Total Loads: Displays the total number of authorized load records (e.g., 71).
- Load Ticket in Card List: Each authorized load appears as an individual card containing key details:
- Ticket #: Unique Load Ticket number.
- Sale: Associated sale name and description.
- Date: Date of authorization.
- Buyer: Name of the buyer linked to the sale.
- Product: Product authorized for the sale.
- Hauler: Transporter responsible for the load.
- Driver: Assigned driver’s name.
- Destination: Delivery point for the load.
- Net: Displays the net weight or quantity (if available).
Example
Ticket 2023008955 is linked to sale ABI-25-PAC-THN-Banks Cr-01, buyer Banks Creek Timber, Inc, and driver Driver1, with the destination Floyd’s STAR CITY AR.
Update Load
Purpose
The Update Load screen allows users to review and edit details of an existing authorized load. It is typically used to add data from the mill such as Scale Ticket, Tons, etc., and any final comments before confirming or syncing the load with the LoadBOSS server.

Key Elements
- Ticket #: Displays the unique load ticket number.
- Sale Name: Shows the sale associated with the load.
- Driver: Displays the driver assigned to the load.
- Trailer #: Shows the trailer number entered during authorization.
- More (Expand/Collapse): Allows access to additional load details if available.
- Scale Ticket (Required): Field to enter the scale ticket number or upload a copy using the image icon. When using an image, this notification will pop up:
- The following details are deduced from the selected scale ticket image: …Would you like to copy these details into the fields?
- Tons (Required): Input field for entering the total load weight in tons.
- Deduct: Field to record any deducted weight.
- Net: Displays the final calculated net weight after deductions.
- Comment: Optional field to add notes (e.g., Guide1).
- May Require Correction (Checkbox): Used to flag the record if it may need review or adjustment.
- Save Button: Saves all updated details and syncs them to the LoadBOSS server.
Example
For above ticket 2023008955, the user can enter the Scale Ticket, specify Tons, and update comments before saving.
Tonnage Warning
1. Tonnage Out of Normal Range Warning

When entering the Tons value, if the value entered is outside the normal range, a warning message appears
Tonnage value of [x] is outside of normal range. Continue?
- Tap YES to proceed with saving the load despite the warning.
- Tap CANCEL to review and correct the entered value before saving
Note that the tonnage range is configured in the Organization Setup.
Tonnage Value Detected in Pounds Warning
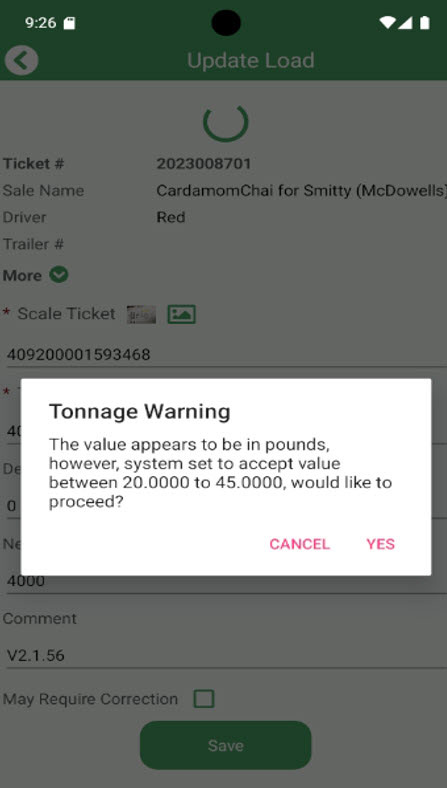
When a tonnage value is entered, the system validates it against the configured range in the organization setup.
If the entered value is outside the normal range, the following warning message appears:
Tonnage Warning
The value appears to be in pounds; however, the system is set to accept values between 20.0000 and 45.0000.
Would you like to proceed?
- Tap YES to continue saving the load.
- Tap CANCEL to revise the entered value.
Note:
- If the entered Tons value exceeds 2000, the system assumes it is in pounds and displays a warning message.
- The acceptable tonnage range (e.g., 20 to 45 tons) is configured in the Organization Setup on the LoadBOSS web portal.
Offline Functionality for Ticket Upload
The Enter Ticket / Authorize Load feature supports offline mode, allowing users to continue working even without an active internet connection.
How It Works:
- When the device is offline, any new Load Ticket authorized in the app is stored locally on the device.
- The ticket remains in a pending sync state, meaning it has not yet been transmitted to the server.
- When an internet connection becomes available, the user must tap Sync Now to upload the locally stored data to the LoadBOSS server.
- After synchronization, the tickets are processed normally.
Note:
While offline, users can still view and edit unsynced tickets, but these loads will not be visible to other users or in the office system until synchronization is completed. The tonnage range is configured in the Organization Setup.
Load Lister
The Load Lister allows you to view, filter, and track all tickets within the system for a given date or range. It helps you reconcile pending tickets and monitor completed loads. Tickets with a red border indicates pending and a green border indicates reconciled tickets.
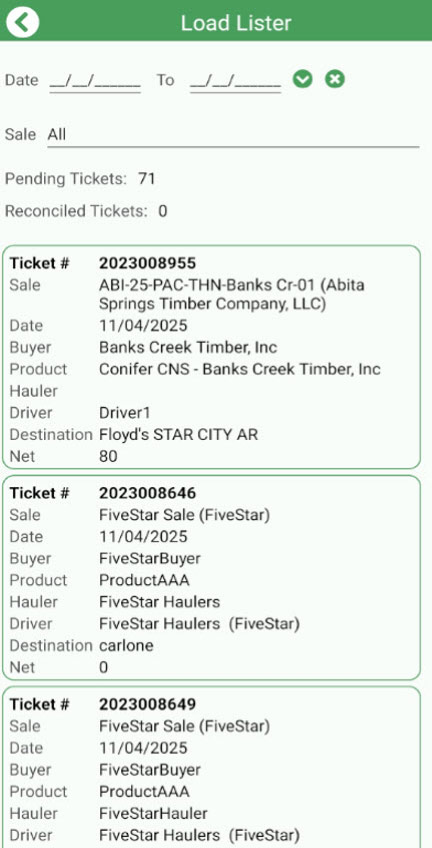
Key Elements
- Date Range Fields:
- From / To: Allows filtering loads by a specific date range.
- ✓ (Apply): Applies the selected date filter.
- ✕ (Clear): Clears the date filter to show all records.
- Sale Dropdown: Enables filtering by sale. Selecting All displays all load records.
- Pending Tickets: Shows total number of loads that are not reconciled (e.g., 71).
- Reconciled Tickets: Displays the total number of loads that have been reconciled (e.g., 0).
- Load Cards: Each load is displayed as an individual card containing summary details:
- Ticket #: Unique identifier of the Load Ticket.
- Sale: Name and description of the sale.
- Date: Date of load creation or authorization.
- Buyer: Customer or buyer linked to the sale.
- Product: Type of product transported.
- Hauler: Transport company or hauler responsible for the load.
- Driver: Name of the assigned driver.
- Destination: Delivery location for the load.
- Net: Displays the final net weight or quantity of the load (e.g., 80).
Example
Ticket 2023008955 under sale ABI-25-PAC-THN-Banks Cr-01 shows a Net weight of 80, with driver Driver1 and destination Floyd’s STAR CITY AR.
View Load
Purpose
The View Load screen allows users to view all details of a specific load ticket, including authorization information, transport details, and scale data. It provides a read-only summary of a completed/authorized load.
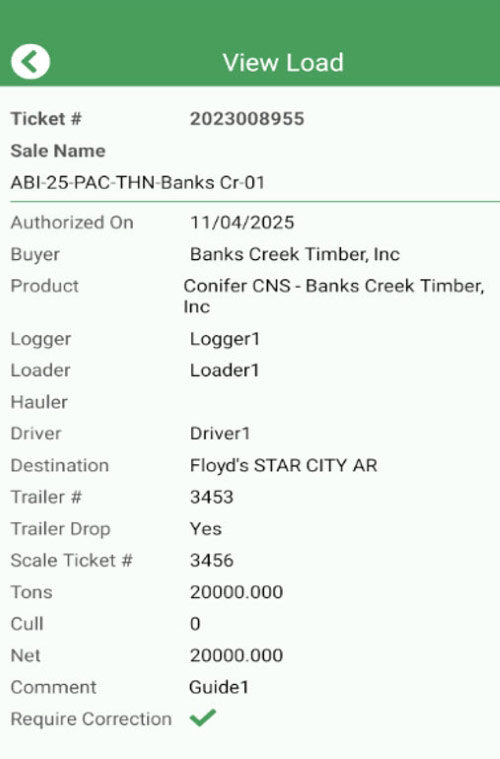
Key Elements
- Ticket #: Displays the unique identifier of the Load Ticket.
- Sale Name: Shows the sale associated with the load.
- Authorized On: Displays the load authorization date.
- Buyer: The buyer or customer linked to the sale.
- Product: The product type associated with the sale.
- Logger: Identifies the logger responsible for the load.
- Loader: Person or equipment used for loading.
- Hauler: Transport company handling the load (if applicable).
- Driver: Assigned driver for the load.
- Destination: Load delivery location/mill.
- Trailer #: The trailer number used for transport.
- Trailer Drop: Indicates whether the trailer was dropped at the destination (Yes/No).
- Scale Ticket #: Displays the scale ticket number linked to this load.
- Tons: The gross weight of the load in short tons. (One equals 2,000 lbs.)
- Cull: Any deducted weight such as debris or unusable material.
- Net: Displays the net load weight after deductions.
- Comment: Optional remarks added during authorization or updates (e.g., Guide1).
- Require Correction: Displays a checkmark (✓) if the record was flagged as needing correction.
Example
Ticket 2023008955 authorized on 11/04/2025 for sale ABI-25-PAC-THN-Banks Cr-01, shows 90 tons, 10 cull, trailer #3453, and destination Floyd’s STAR CITY AR.
Integration with Silvics Office
Once a ticket is updated in the LoadBOSS app, and transmitted to the LoadBOSS server, it is automatically forwarded to the Removals to Post section in Silvics Office.
This process ensures that all reconciled loads are available for Office users to review, validate, and post to the system for final accounting or reporting.
Workflow Summary:
- A user authorizes and updates a load in the mobile app.
- After entering scale ticket and weight details, the load is automatically reconciled in the LoadBOSS Portal.
- The reconciled ticket is automatically synced to the Removals to Post page in Silvics Office.
- Office users may then filter, verify, and post these removals under the corresponding Organization, Sale, or Destination.
Note:
Only tickets that are successfully reconciled and processed through the LoadBOSS server will appear in the Removals to Post section of Silvics Office. Pending or incomplete loads remain listed under Load Lister in the mobile app until reconciled.
Settings
The Settings screen in LoadBOSS provides user information, system details, and connectivity controls. It also allows you to manage synchronization, renew login, clear cache, and switch between online and offline modes.
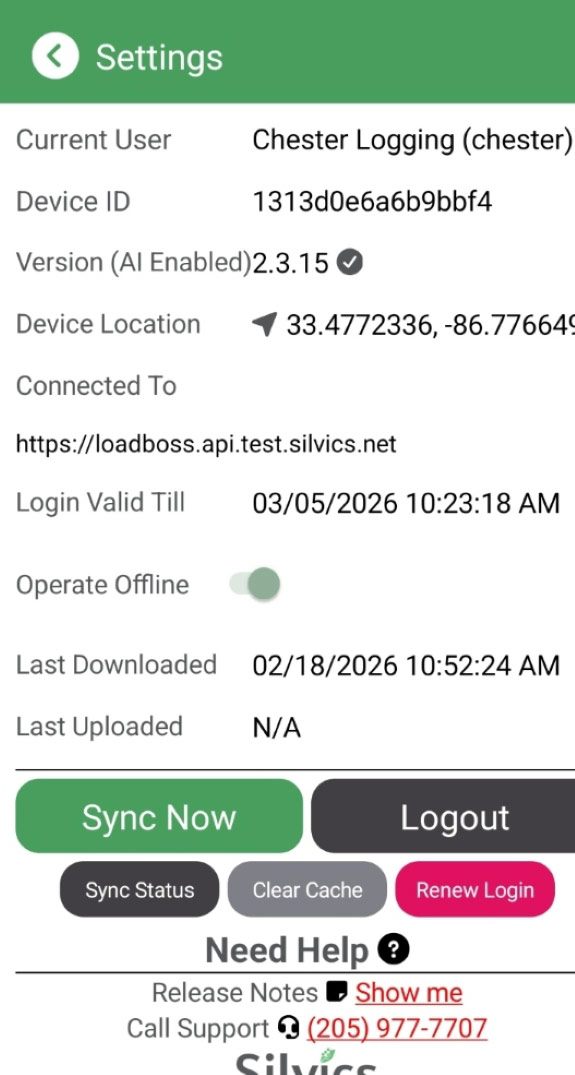
1. User & Device Information
- Current User – Shows the logged-in user’s role (e.g., SuperAdmin).
- AI Functionality – Indicates if AI features are enabled (checkmark = active).
- Device ID – Unique identifier of the device.
- Version – The installed app version.
- Location – Displays current GPS coordinates (used for load ticket tracking).
- Last Synced – Shows the last successful data sync time.
- Connected To – Displays the server URL the app is currently linked with.
2. Key Controls
- Operate Offline (Toggle)
- When ON (sage green) → The app runs in Offline mode. Load tickets are stored locally and not sent to the server until Sync Now is pressed.
- When OFF (gray) → The app automatically syncs tickets in the background
- Stable internet connectivity required to work online.
- Sync Now (Button)
- Manually uploads all pending tickets to the server.
- Useful when working in Offline mode or after reconnecting to the internet.
- Logout (Button)
- Logs the current user out of the application.
- Sync Status (Button)
- Provides details of the synchronization progress or errors.
Best Practices
- Always check Last Synced time before logging out or leaving the work site.
- If working in remote areas, keep Operate Offline enabled and use Sync Now once back in network coverage.
- Regularly verify the App Version to ensure you are on the latest release.