

Inventory Import to Spatial Ai
Overview
This document provides instructions on how to import inventory data from the MS Access version of Inventory (v7.07 or later) into Spatial Ai (v2.2.6.x or later).
The user must have available to them a Inventory MDB where the inventory has been compiled to a Stand level and has been processed in Inventory to be imported into Silvics Spatial. The user must also have knowledge of which stand or stands in Silvics Spatial the inventory is to be imported into.
Need More Help?
For personalized assistance tailored to your specific needs, speak with a knowledgeable customer service representative.
Workflows
Importing Inventory Data
Step 1: If the application is not already running start the application.
Step 2: If the Stands layer is not open in the current working set open the Stands layer for the Organization the Stands belong to that are to have their inventory imported from the Inventory MDB.
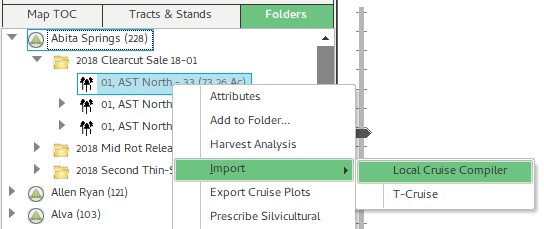
Step 3: Navigate to and select on the map the Stand or Stands you wish to perform the import from Inventory for. You also have the option to locate the Stand or Stands in the “Tract & Stands” tree view or the “Folder” tree view.
Step 4: Once the stands are selected right click on the map and choose the “Explore | Import | Local Inventory” context menu option.
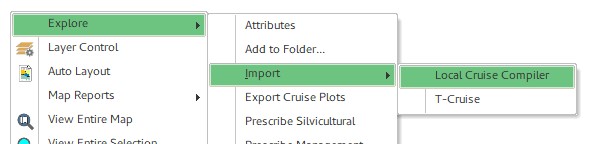
Step 5: If the Stand or Stands are selected in the “Tract & Stand” or “Folder” tree views then the menu navigation is right click, “Explore | Import | Local Inventory”.
Step 6: Once you have chosen the Import | Local Inventory option the import form will be displayed.
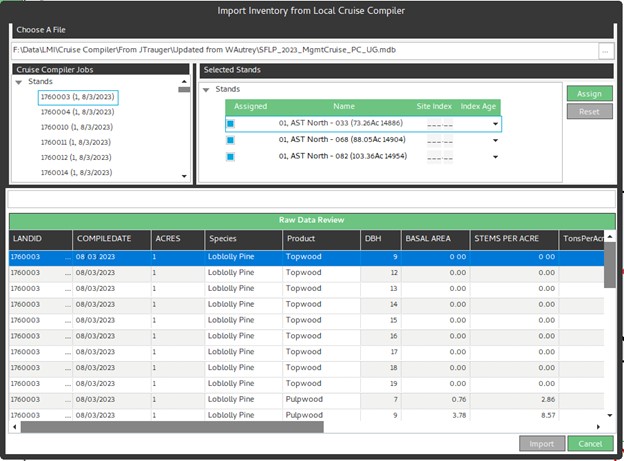
Step 7: Once the form is displayed use the button with the ellipsis (…) near the top of the form under the “Choose a File” section, to navigate to and open the Inventory MDB you wish to import. If the LandIds stored in the Inventory MDB match the StandKeys of the Stands you have selected for this import session, then the system will automatically match the Inventory Stand (those listed in the “Inventory Jobs” list) to those in the “Selected Stands” list and the check box in the far left column will be checked. If this does not occur, then go to step 8.
Step 8: If the system was not able to assign the Inventory Stands to the Selected Stands, you can accomplish this using the following steps:
- Select a Stand in the “Inventory Jobs” list.
- Select a Stand in the “Selected Stands” list.
- Press the “Assign” button.
- Note: When the “Assign” button is pressed there are validations done on both the “Selected Stand” to check if there is a pending Logging activity that has not been completed and on the Inventory data to look for duplicate rows etc. Some of these validations will allow you to confirm that you want to proceed, others will not allow you to make the assignment.
Step 9: Once all the Stands in the “Selected Stands” list have been “Assigned” a valid Inventory Stand from the “Inventory Job” list, the Import button will be enabled (on the bottom of the form) and the “DBH Comparison” and “Product Comparison” tabs will be populated.
- You can use the two comparison tabs to see the TPA, BA/Ac and Tons/Ac values at the 2 different levels (DBH and Product).
- This is intended to allow you to verify that the data looks correct before pressing the “Import” button.
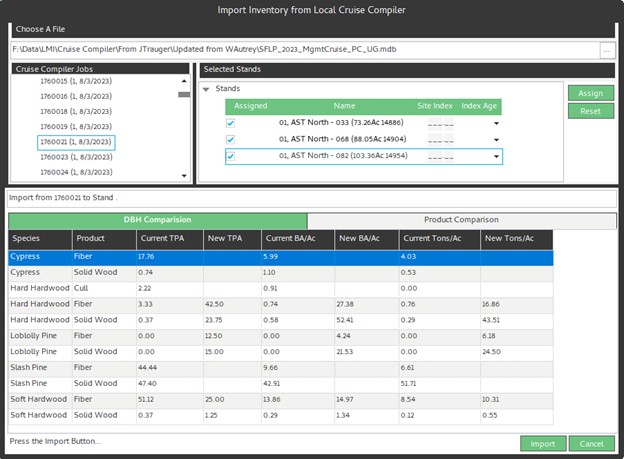
Step 10: Press the “Import” button to complete the import process. Once the import process is complete you will receive a confirmation message and the form will close.
Step 11: You may now go to each Stand individually and inspect the data if desired. Note that the system allows creates and completes a “Inventory Import” activity to record the import action in the Activity History tab on the Stand Attributes form.